|
 |
|
Cutting Edge U-2S Cockpit |

HyperScale is proudly sponsored by Meteor
Productions
As I mentioned in my
U-2R/S / TR-1A Cockpit Review, this project was started some years
back when Cutting Edge first released all their original
conversions, updates, and decals for the U-2R/S / TR-1A. Without a
cockpit set, though, I was not up for completing the kit and re-boxed it
to await the release of a resin cockpit set. When Cutting Edge
released their resin cockpit set in the end of 2002, I dug out the kit
and re-started it.
On all of my current projects, I tend to be writing my model postings
at the same time as I build the models. This posting has been reworked
several times as the project changed its focus. Originally, I was
planning a very simple build with a replacement resin cockpit, resin
nose, and resin Senior Span/Spear upgrade. These were all simple,
drop-in additions that required almost no surgery to use.
Then, I got more into the project and ended up going hog wild on
detailing, scratch building all sorts of details on the model. I have
never claimed to be unaffected by AMS (Advanced Modelers Syndrome), I
just seam to be able to work through it when the bug bites me hard. This
posting swelled into a monster five-part posting detailing all sorts of
scratch-building items for the U-2R/S.
Then, a HyperScale friend convinced me that all these scratch-built
items should get cast into resin so that others (espescially him) could
use them, too. To that end, the scratch-built stuff became masters for
Cutting Edge to use to market some more U-2R/S resin update sets
in their already extensive resin line. To see more about the
scratch-building I did on the masters for the Cutting Edge sets,
see the reviews I wrote on those sets. This posting will only deal with
the usage of those sets in the Italeri U-2R/S kit.
The outcome of all this reworking of my writing is now a three-part
posting. The writing is not as long as when I had all the
scratch-building work highlighted. This is the first part and deals with
a brief history of the U-2S "Dragon Lady", a review of the Testor/Italeri
kit, and the construction of inside portions of the fuselage using lots
of resin goodies. The second part will come along later and detail the
exterior of the fuselage, the construction of the wings, and the
completion of the airframe construction. The final part of the group
will detail the painting and finishing of the model.
A Brief U-2 Family History
First, let's do a little historical writing on the U-2. This is a
very brief (and vastly over-simplified) review of the U-2 development
history. In the beginning, there was the U-2A. With an engine upgrade,
many of these were redesignated to U-2C. Further modifications to the
U-2C created the U-2E, U-2F, U-2G, and U-2H. The U-2D was a
factory-built two-seat U-2, basically equivalent to the U-2C. A couple
U-2A/C aircraft were also re-manufactured into two-seat aircraft and
designated as U-2CT. As the sensor systems got heavier and bulkier to
carry, the performance of the U-2 started to suffer quite a bit. An
upgraded U-2 was needed.
Answering the call, Lockheed revised the U-2 design and increased it
in size (both in length and width) with the new aircraft being
designated U-2R ("R" for "Revised"). As attrition and combat losses
mounted, the Air Force determined they needed more U-2R aircraft. To
distance the additional aircraft from the "black-ops" reputation of the
U-2 designation, they designated them as TR-1A (two-seat TR-1B). These
were basically carbon copies of the U-2R.
In time, the logistics of supporting two mostly identical airframes
with two designations got to be a problem. Also, the TR-1 designation
failed to distance the new aircraft from the "black-ops" reputation of
the U-2 designation. In 1991, to solve the logistical issues, all TR-1A
aircraft were re-designated to be U-2R aircraft. The TR-1B became the
U-2RT.
The U-2S designation came along in the 1990s when the surviving U-2R
aircraft were upgraded with newer engines. According to most references,
all U-2R aircraft are now U-2S aircraft. The upgrade has almost no
outward feature to tell whether an aircraft is a U-2R or U-2S. The
deletion of two small air louvers on the fuselage over the wing root is
the only way to tell for sure that a given aircraft is a U-2S.
I saw the U-2S aircraft in the picture below at the 1996 Andrews AFB
air show. It inspired me a lot and is the reason I decided to built the
model you see in this posting. I knew very little about the U-2 before
starting this project, so I needed to do more research on this aircraft
than I have had to do on any of the other projects I have completed in
the last few years.
Figuring I was not the only person with limited U-2 knowledge, I
created a reference web page for the U-2S. I have also written quite a
bit more in this construction feature than I typically do. My hope is to
save other modelers from having to search as hard as I did for this
information.
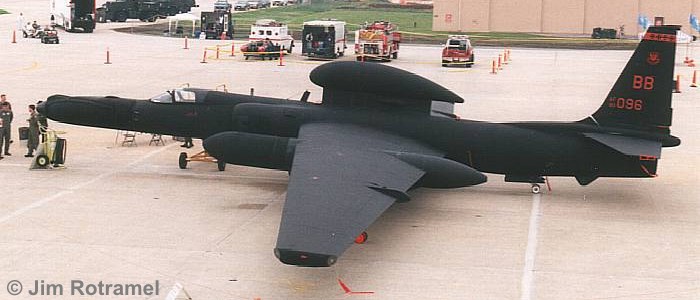
U-2S at the 1996 Andrews AFB Air Show —
Click the Picture to View My Reference Page on the
U-2
For more information on late model U-2 aircraft, see my reference
list at the end of this posting.
The Testor / Italeri late model U-2 kits have been marketed a
few times as different designations. One of the original releases from
Testor called the kit a "Lockheed TR-1A". Another release was
from Italeri and was for a TR-1A/B "Sky Patrol". Both these
releases contain identical plastic components to each other, only the
instructions and decals changed. Both these releases provide alternate
pieces for building either a single seat U-2R / TR-1A or a two-seat
U-2RT / TR-1B. The super pods in these kits are smooth and regular with
no sensor systems represented.
|
Caveat
I have defended
Testor/Italeri's late model U-2s as being good kits on the
HyperScale Forum, and I stand by that assessment.
Built
out-of-the-box, nobody would miss the fact that this is a late
model U-2 "Dragon Lady". However, that does not mean the kit is
perfect. There are notable accuracy issues and ommissions with
several points in the kit, but most all of these amount to details
that only a U-2 crew chief might see. Indeed, it took me weeks of
research to find out all I have concerning the U-2 and apply my
findings to the model.
What I write from here out about all the things I fixed or changed
on the kit relates to myself wanting to stretch my legs and take
on some challenges. The kit for the most part, except for the
cockpit, would be quite acceptable out of the box. |
The Testor / Italeri late model U-2 kits are actually not bad
kits on their own. They were above average when they were released in
the early 1980s. They require some care in construction, have a few fit
problems, and are a bit "soft" on some details, but overall they are not
bad. Built out-of-the-box, they are plausible representations of the
late model U-2 as it looked in the 1980s. They do not provide any of the
more common sensor fits seen on current U-2 aircraft.
The scribing is the raised variety, which turns some modelers off,
but it is petite enough for my taste. The accuracy of the scribing is up
for grabs, though. Italeri had very little information to work
with when they originally tooled this kit. They got as close as they
could with very limited and (in some cases) sketchy data.
And, let me stress that the constructed model is HUGE! The
wingspan is a very impressive 26 inches when done. This caused me to
have to think of unique ways to display the model on my shelves, but
that is a different story...
The latest release of this kit is from Italeri and is for a
U-2R "Senior Span". This release differs from the earlier ones in that
it deletes the two-seat option and provides an extra sprue tree with all
the updates to build a Senior Span/Spear/Ruby aircraft. The extent of
updates provided on this extra sprue caught me by surprise. I was
initially going to build the "Sky Patrol" release of the kit, which I
had picked up back in 1996. After acquiring the "Senior Span" release,
just out of curiosity over the new pieces, I decided that I would build
it instead of the "Sky Patrol" kit.
Just looking at the box art before I opened the "Senior Span" kit, I
noted both Senior Spear and Senior Ruby installations on the aircraft as
well as other airframe updates that I knew were not in the "Sky Patrol"
release of the kit. Would all these be in the box?
In a word -- YES! The new sprue tree was much larger than I expected
and provided the Senior Span/Spur dorsal antenna pod, the Senior Spear
super pod antenna canoe with ventral antenna farms, and the Senior Ruby
flattened super pod sides. Additionally, there were a number of airframe
updates included to provide the GPS antenna on the left wing and the ECM
dimples on the engine entake sides. Besides removing the parts for the
two-seat aircraft, another change to the original "Sky Patrol" sprues
was the deletion of the standard super pod nose cones. This then forces
the build of only a Senior Ruby updated aircraft from this kit.
Other new parts found only in the "Senior Span" kit relate to very
early airframes, also. These include an alternate tail top without any
ECM fairing, an alternate ADF antenna for the spine, and
alternate/different style ECM pods for the wing tips. Expect to see a
very early U-2R released from Italeri at some point in the
future.
The Testor "Lockheed TR-1A" and Italeri "Sky Patrol"
kits are both comprised of 85 pieces. The "Senior Span" kit deletes 5
pieces from the kit associated to the two-seat option and the standard
super pod nose cones. It then adds 41 pieces to the kit on a new sprue
that provides all the new airframe upgrades, bringing the count of
pieces up to 121 in the "Senior Span" release. Everything is molded in
black styrene (with clear canopy pieces). I would prefer the more
standard gray colored plastic because the black color makes it hard to
see molded details and imperfections, but I had to make due with what
Italeri provided.
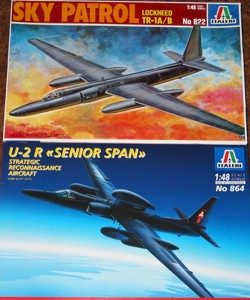
Italeri Box Art |
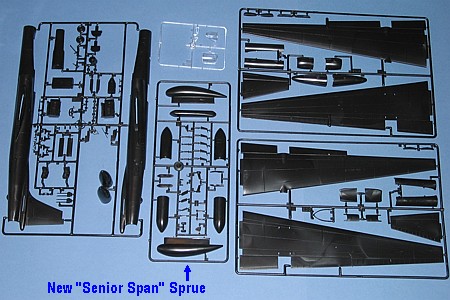
"Senior Span" Kit Sprues |
Cutting Edge 1/48 Scale
U-2 Update Sets
|
I used six different Cutting Edge update sets on this
model as shown in the following pictures. I have some personal pictures
I took at the 1996 Andrews AFB air show of a Senior Span/Spur/Spear U-2S
and wanted to build that same aircraft. These sets provided me all the
necessary updates to do this (and then some). Indeed, Dave Klaus at
Cutting Edge confirmed to me once that this exact aircraft (from the
1996 Andrews AFB air show) was a major source for the documentation that
went into the Cutting Edge Senior Span/Spur/Spear update set and
ASARS II nose.
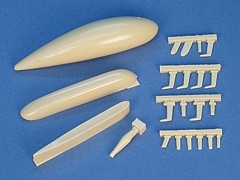
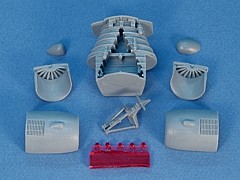
Senior Span/Spur/Spear Set
(CEC48104) |
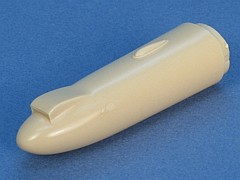
ASARS II Nose
(CEC48106) |
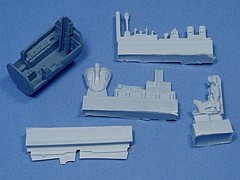
Cockpit Set
(CEC48409) |
Wing Correction Set
(CEC48441) |
Fuselage Update Set
(CEC48442) |
Engine Exhaust Set
(CEC48443) |
All the sets are quite nice. For full reviews of each set, click on
the photos above.
At this point, you might be trying to add up the cost in your head
for all these sets. Let me help you out. Altogether, these sets amount
to just over $100.00 USD (as calculated from the prices listed on the
Meteor Productions web site). Add some Cutting Edge decals (which
I did for my model) and the cost rounds out to about $110.00 USD. All
this is for a kit that you can find at swap meets for about $12.00 USD
(the early, non-Senior Span releases).
Whether all this is worth it for any kit is a decision between each
modeler and his wallet. For me, the answer is, "Yes, absolutely".
Your opinion may vary, though.
I started tinkering with this kit almost five years ago. When push
came to shove and I was ready to start work on the fuselage, I found the
kit cockpit rather simplistic and lacking in details. I figured that I
could start scratch building a new cockpit, or I could put off building
the kit in hopes that someone would release a resin cockpit update. A
brief talk with Dave at Cutting Edge confirmed they eventually
were going to do a cockpit set. So, I re-boxed the kit and placed it on
the "inactive pile" to await a resin cockpit set.
Now, roll the clocks ahead four and a half years.
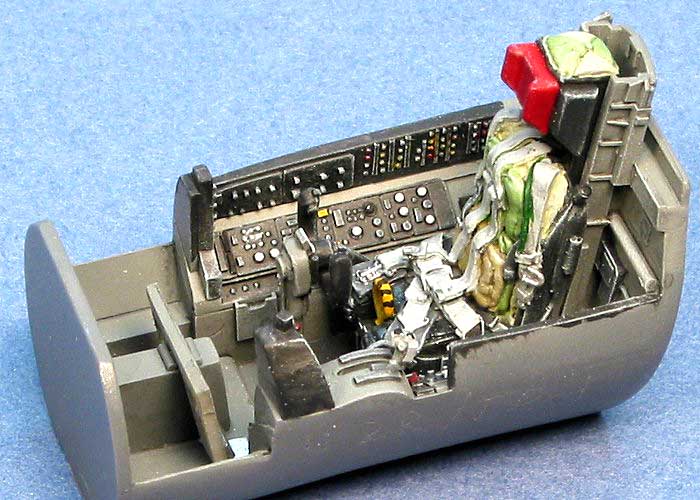
Eventually, Cutting Edge released the U-2R resin cockpit
update set. It is a really great cockpit set and immediately had me
wanting to dig out the old U-2 kit which was still sitting in the
"inactive pile" in my closet. Check out my cockpit review to see how
easily the resin cockpit dropped into the kit. By the time I had
finished writing the cockpit review, I already had the cockpit
integrated into the U-2 kit and ready for paint.
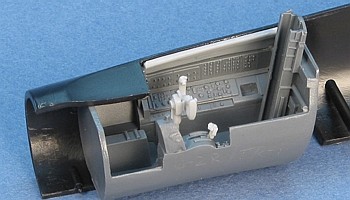
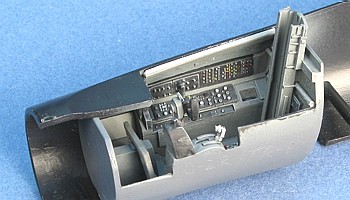
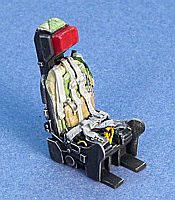
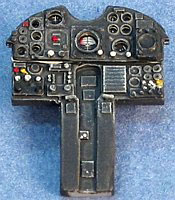
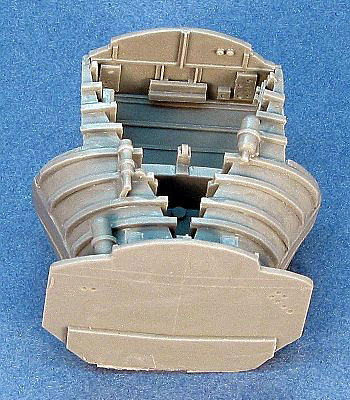
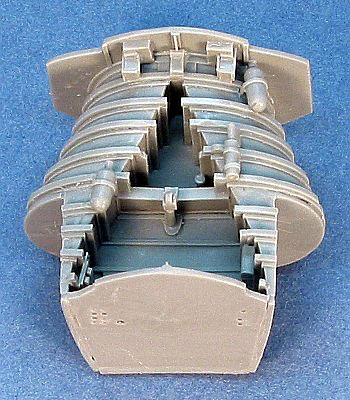
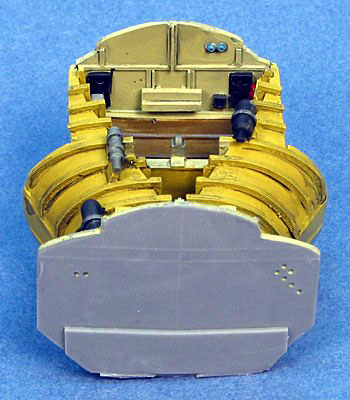
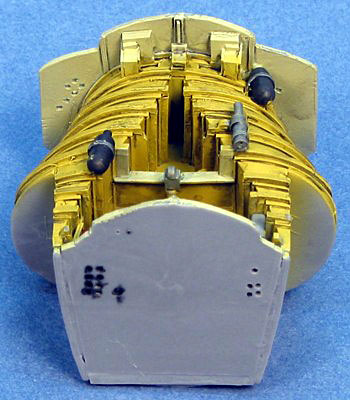
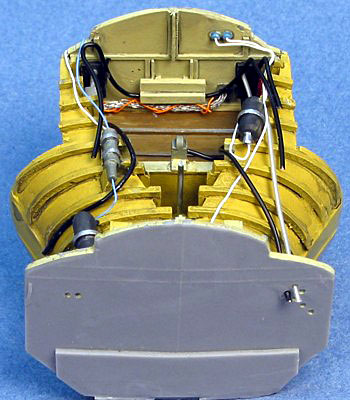
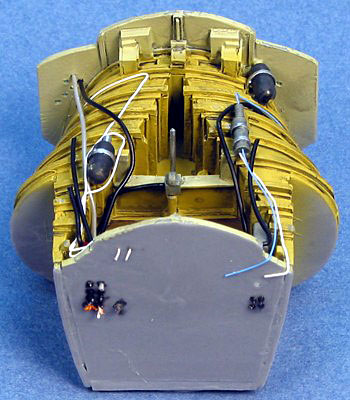
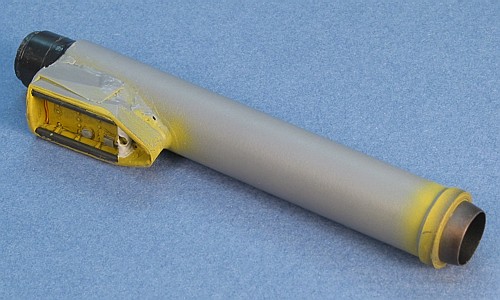
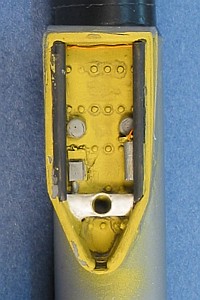
Cockpit |
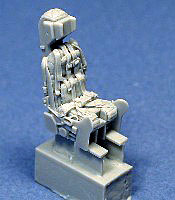
Ejection Seat |
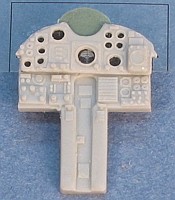
Main Instrument Panel |
From photographs, U-2R (and presumably U-2S / TR-1A) cockpits appear
to be Dark Gull Gray (F.S.36231). I painted the entire cockpit in this
color, then picked off the instrument panels with Interior Black.
Various details were painted yellow and red and I dry brushed the whole
cockpit in Light Ghost Gray (F.S.36375). Pictures showed the ejection
seat to be black, so I painted the whole thing in Interior Black. The
rear cushion is a green-gray color and the lower cushion appears to be
black leather. I painted the seat harnesses in Light Ghost Gray
(F.S.36375). I know -- cloth items do not have F.S. numbers for color,
but I find this color best captures the color of the sort-of metallic
looking silver/gray cloth from which many seat harnesses are made.
With the cockpit painted, I mounted it inside the right fuselage
half.
Cockpit |
Ejection Seat |
Main Instrument Panel |
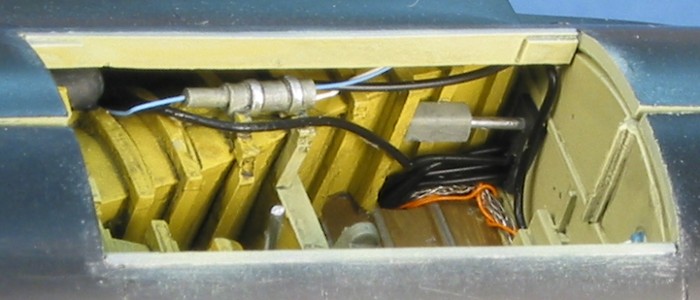
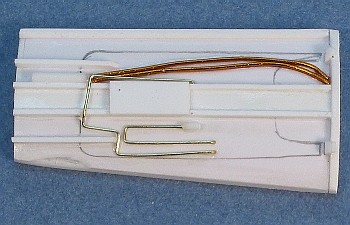
Next, I turned my attentions to the main wheel bay. The Italeri
representation of this area is complete fiction. The kit piece is not
even deep enough to hold the wheels if they retracted. Fixing this
shortcoming lead me down the path that eventually had me scratch-build a
new wheel bay and provide it to Cutting Edge so they could use it
in thier U-2R/S Fuselage Update set.
I removed the slag from the Cutting Edge wheel bay unit and
painted it according to the colors stated on the instruction sheet. For
the weird light greenish color, I was speaking with a friend in my model
club, Ed. He said the color reminded him of the green color in the new
Israeli camouflage (like on the F-15I). I had to agree, although I had
not made that connection myself. I compared this color (F.S.34424) to
the color pictures I have, and sure enough, it was a pretty close match.
Hence, the areas of the wheel bay and the engine intakes that required
this color were painted using F.S.34424 from the old Floquil
Military Colors paint line.
Referring to documentation pictures, I added some varying colors of
wiring to the bay that were not part of the cast piece. Because the
wires stand well away form any of the inner surfaces, having them cast
in place was not feasible and still look right to me. Using pre-colored
ignition wires for 1/24th scale car
models, the job of wiring the wheel bay went fast. There are
flashed-over holes in both bulkheads of the wheel bay to assist in
holding the wiring in place. I just re-drilled these open and added the
pre-colored wiring to match what I saw in the pictures.
The following series of pictures traces the wheel bay from raw resin
to installed wheel bay.
Unpainted Wheel Bay |
Unpainted Wheel Bay |
Painted Wheel Bay |
Painted Wheel Bay |
Completed Wheel Bay |
Completed Wheel Bay |

Completed Wheel Bay - Installed |
Completed Wheel Bay - Installed |
The only detail items on the U-2R/S airframe not covered in the
Cutting Edge update sets are the speed brakes. They did ask me to
create a set for these, but the complexities of creating all the piping
in the wells and still have it be cast-able got the best of me. I found
myself drifting away from the project because I did not want to deal
with it. I decided to drop the idea of creating masters and just created
some speed brake details for myself. Sorry guys...
I completely cut away the kit-provided speed brake wells and
scratch-built new ones from sheet and strip styrene. I detailed the new
wells using assorted sizes of brass and copper wire. The speed brake
wells on the U-2R/S are not really "wells" and are more "bays". That is
to say they really do not have walls to box them off. They are backing
walls with assorted ribbing and plumbing that are mostly open all the
way around the speed brake opening on the fuselage. The images below
show the completed wells before and after painting.
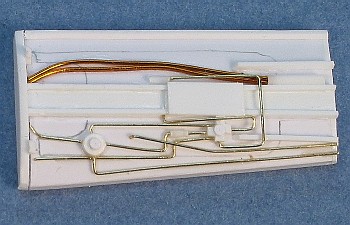
Left Speed Brake Wells - Unpainted |
Right Speed Brake Wells - Unpainted |
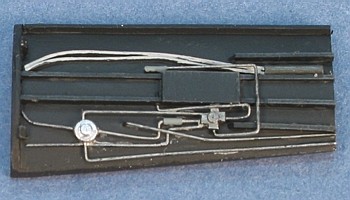
Left Speed Brake Wells - Painted |
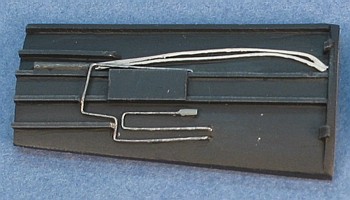
Right Speed Brake Wells - Painted |
With the bays completed, I used my Dremel tool to remove the kit-molded
details inside the speed brake doors. I rebuilt the details using more
sheet and strip styrene. With the doors done, I could then measure the
precise length for the brake actuators and scratch-built these from
styrene rod and brass wire. All painted and finished, the final speed
brakes looked much better than the kit-molded version.
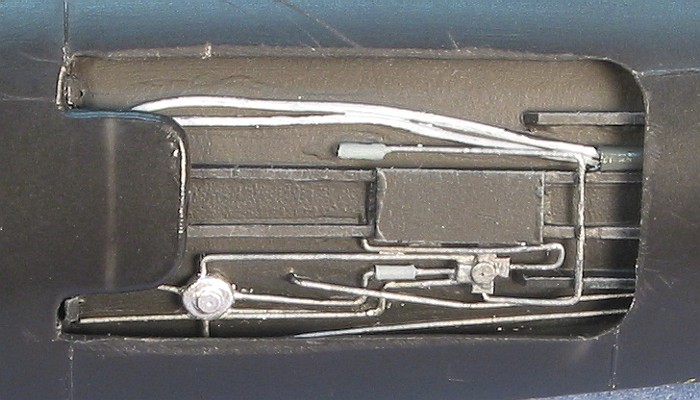
Installed Left Speed Brake |
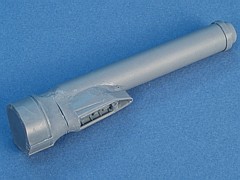
The engine on the U-2 is buried deep inside the airframe with a
rather lengthy tail pipe to reach all the way to the engine exhaust
point under the vertical tail. The kit piece for the tail pipe is about
1/4" deep and includes details on the inside that are intended to
represent the rear turbines of the engine. Cutting Edge's exhaust
pipe corrects this area of the the kit with a unit providing a much more
realistic depth to the engine exhaust.
I painted and installed the replacement engine exhaust following the
Cutting Edge instructions.
The kit tail landing gear strut needed some minor detailing added to
represent the rigging used to steer the aircraft when it is on the
ground. I added these details and installed the strut into the wheel
well that is molded as part of the engine exhaust piece.
Engine Exhaust |
Tail Wheel Well |
With all the update sets installed, the inside of the fuselage was
getting to be a very busy place. I finally could assemble the fuselage
and move on to other areas of the model.

This completed my major construction work inside the fuselage. I had
a lot more to do to the exterior of the fuselage and big plans for the
wings, so I decided these areas deserved their own posting to describe
what I did. Look for the fuselage completion, the wing construction, and
the assembly of the complete airframe in part two of my U-2S "Senior
Span/Spur" project postings.
(Newest to Oldest)
-
U-2R/S Walk Around by David W
Aungst
On-Line HyperScale Reference, 2003
-
U-2: The Second Generation by
Chris Pocock
World Airpower Journal, Volume 28, AirTime Publishing, 1997
-
Dragon Lady by Ted Carlson /
Toyokazu Matsuzaki
Koku-Fan Magazine, Volume 1996-04, Bunrin-Do Company, Limited, 1996
-
Recce Tech by Paul F Crickmore
Osprey Color Series, Osprey Aerospace Publishing, 1989
-
U-2 Spyplane in Action by Larry
Davis
, Squadron In Action #86, Squadron Publishing, 1988/2002
-
Lockheed U-2R/TR-1 by Jay Miller
AeroFax MiniGraph #28, AeroFax, Inc., 1988
-
Lockheed U-2 by Jay Miller
AeroFax AeroGraph #3, AeroFax, Inc., 1983
Model, Description and Images Copyright ©
2003 by David Aungst
 Home |
What's New |
Features |
Gallery |
Reviews |
Reference |
Forum |
Search
Home |
What's New |
Features |
Gallery |
Reviews |
Reference |
Forum |
Search